반응형
l 계산기
안드로이드 이용하여 계산기 만들기
더하기 빼기 곱하기 나누기 나머지
0으로 나눌 수 없는 예외 사항 넣기
| Activity_main.xml
<?xml version="1.0" encoding="utf-8"?>
<LinearLayout xmlns:android="http://schemas.android.com/apk/res/android"
    xmlns:app="http://schemas.android.com/apk/res-auto"
    xmlns:tools="http://schemas.android.com/tools"
    android:layout_width="match_parent"
    android:layout_height="match_parent"
    tools:context=".MainActivity"
    android:orientation="vertical">

    <EditText
        android:layout_width="wrap_content"
        android:layout_height="wrap_content"
        android:hint="숫자1"
        android:id="@+id/Edit1"
        android:layout_margin="10dp"/>
    <EditText
        android:layout_width="wrap_content"
        android:layout_height="wrap_content"
        android:hint="숫자2"
        android:id="@+id/Edit2"
        android:layout_margin="10dp"/>
    <Button
        android:layout_width="match_parent"
        android:layout_height="wrap_content"
        android:text="더하기"
        android:layout_margin="10dp"
        android:id="@+id/add"/>
    <Button
        android:layout_width="match_parent"
        android:layout_height="wrap_content"
        android:text="빼기"
        android:layout_margin="10dp"
        android:id="@+id/minus"/>
    <Button
        android:layout_width="match_parent"
        android:layout_height="wrap_content"
        android:text="곱하기"
        android:layout_margin="10dp"
        android:id="@+id/muti"/>
    <Button
        android:layout_width="match_parent"
        android:layout_height="wrap_content"
        android:text="나누기"
        android:layout_margin="10dp"
        android:id="@+id/divi"/>
    <TextView
        android:layout_width="wrap_content"
        android:layout_height="wrap_content"
        android:textColor="#ff0000"
        android:textSize="30dp"
        android:layout_margin="10dp"
        android:text="계산결과 : "
        android:id="@+id/result"/>

</LinearLayout>
| MainActivity.java
package com.example.a301.calcu;

import android.support.v7.app.AppCompatActivity;
import android.os.Bundle;
import android.view.MotionEvent;
import android.view.View;
import android.widget.Button;
import android.widget.EditText;
import android.widget.TextView;

public class MainActivity extends AppCompatActivity {

/*7개의 위젯과 관계되는 변수선언*/
EditText edit1, edit2;
Button btnAdd, btnSub, btnMul, btnDiv;
TextView textResult;
/*에디트텍스트에 입력한 문자열값을 저장할 변수선언*/
String num1, num2;
/*두 문자열을 계산한 결과를 저장할 변수 선언*/
Integer result;

@Override
protected void onCreate(Bundle savedInstanceState) {
super.onCreate(savedInstanceState);
setContentView(R.layout.activity_main);

/*activity_main.xml에 생성한 위젯을 변수에 대입*/
edit1 = (EditText)findViewById(R.id.Edit1);
edit2 = (EditText)findViewById(R.id.Edit2);
btnAdd = (Button)findViewById(R.id.add);
btnSub = (Button)findViewById(R.id.minus);
btnMul = (Button)findViewById(R.id.muti);
btnDiv = (Button)findViewById(R.id.divi);
textResult = (TextView)findViewById(R.id.result);

btnAdd.setOnTouchListener(new View.OnTouchListener() {
@Override
public boolean onTouch(View arg0, MotionEvent arg1) {
num1 = edit1.getText().toString();
num2 = edit2.getText().toString();

result = Integer.parseInt(num1)+Integer.parseInt(num2);
textResult.setText("계산결과:"+result.toString());
return false;
}
});
btnSub.setOnTouchListener(new View.OnTouchListener() {
@Override
public boolean onTouch(View arg0, MotionEvent arg1) {
num1 = edit1.getText().toString();
num2 = edit2.getText().toString();

result = Integer.parseInt(num1)-Integer.parseInt(num2);
textResult.setText("계산결과:"+result.toString());
return false;
}
});
btnMul.setOnTouchListener(new View.OnTouchListener() {
@Override
public boolean onTouch(View arg0, MotionEvent arg1) {
num1 = edit1.getText().toString();
num2 = edit2.getText().toString();

result = Integer.parseInt(num1)*Integer.parseInt(num2);
textResult.setText("계산결과:"+result.toString());
return false;
}
});
btnDiv.setOnTouchListener(new View.OnTouchListener() {
@Override
public boolean onTouch(View arg0, MotionEvent arg1) {
num1 = edit1.getText().toString();
num2 = edit2.getText().toString();

result = Integer.parseInt(num1)/Integer.parseInt(num2);
textResult.setText("계산결과:"+result.toString());
return false;
}
});
}
}
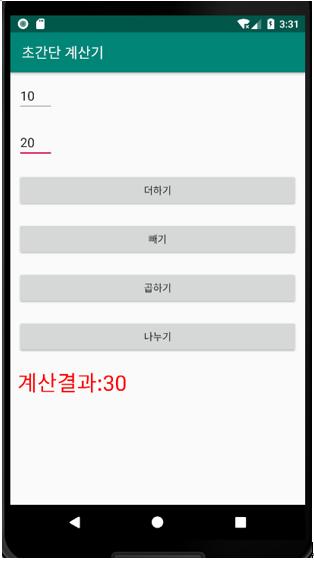
| 결과

클릭과 터치는 비슷하게 동작하며 작성법도 거의 동일한다. onClickListener 대신에 onTouchListener를 사용하면 된다.
잠깐) 리스너(Listener) 인터페이스
| 버튼, 체크박스, 라디오버튼 등을 클릭(또는 터치)하여 어떤 동작이 일어나도록 할 때는 해당 위젯에 리스너 인터페이스를 설정해서 처리하도록 해야 한다. 예를 들어 OnTouchListener 인터페이스에는 onTouch() 메소드가 포함되어 있는데, onTouch() 메소드를 구현하고 터치할 때 필요한 내용을 코딩하는 것이 바로 프로그래머가 할 일이다. |
위와 같이 계산기를 만들고 나서 다음과 같이 기능을 추가하거나 변경하자.
- 터치가 아닌 클릭으로 변경
OnTouchListener -> OnClickListener로 변경
- 나머지값 구하기 버튼 추가
Button에 나머지 버튼 추가하기, +(더하기) 대신에 나머지(%) 추가하기
<Button
    android:layout_width="match_parent"
    android:layout_height="wrap_content"
    android:text="나머지"
    android:layout_margin="10dp"
    android:id="@+id/namu"/>
- 값을 입력하지 않고, 버튼을 클릭할 때 오류 메시지를 토스트로 나타내기
- 실수값 계산하기
result = Integer.parseInt(num1)+Integer.parseInt(num2);
->
result = Float.parseFloat(num1) + Float.parseFloat(num2);
즉 int형의 object형인 Integer을 float의 object형인 Float로 다 바꿔주면 된다.
- 0으로 나누면 토스트 메시지를 나타내고 계산하지 않기
/*나누기 버튼을 터치했을 때의 리스너를 설정한다.*/
btnDiv.setOnTouchListener(new View.OnTouchListener(){
    /*onTouch() 메소드를 구현한다.*/
    public boolean onTouch(View arg0, MotionEvent arg1){
        /*에디트텍스트에 입력된 값을 num1, num2 변수에 대입한다.*/
        num1 = edit1.getText().toString();
        num2 = edit2.getText().toString();
        if(Integer.parseInt(num2)==0){
            Toast.makeText(getApplicationContext(), "0으로는 나눌 수 없습니다.",
                    Toast.LENGTH_LONG).show();
        }else
        /*Integer.parseInt() 메소드를 사용하여 num1, num2를 정수형으로 변환한 후 두 값을 더한다.*/
        result = Integer.parseInt(num1)/Integer.parseInt(num2);
        /*정수형 결과를 다시 문자열로 변경한 후 텍스트뷰에 setText()를 이용해서 대입한다.*/
        textResult.setText("계산결과:" + result.toString());
        /*false값을 돌려준다 자동 완성되는 부분이다.*/
        return false;
    }
});
[관련 게시글]
| [Android] 안드로이드 스튜디오 설치 : https://seul96.tistory.com/58 [Android] 바람개비 회전 애니메이션 : https://seul96.tistory.com/62 [Android] 화면터치 시 이미지 따라오기 : https://seul96.tistory.com/310 [Android] 그림 글 배치 : https://seul96.tistory.com/63 [Android] 글의 목록 만들기 : https://seul96.tistory.com/311 [Android] manifests, java, res / 레이아웃 유형 : https://seul96.tistory.com/64 [Android] toast 배경색 변경 방법 + 색상표 : https://seul96.tistory.com/65 [Android] 계산기 구현 : https://seul96.tistory.com/66 [Android] 위치 배열 gravity linear layout relative layout 사용 : https://seul96.tistory.com/67 [Android] 액티비티 전환 intent 예시 + 4대 컴포넌트 : https://seul96.tistory.com/68 [Android] 이벤트 처리와 액티비티간 이동 : https://seul96.tistory.com/70 [Android] 리스트뷰 : https://seul96.tistory.com/79 [Android] 커스텀 리스트뷰 : https://seul96.tistory.com/80 [Android] 안드로이드 공공데이터(API) 사용하는 방법 : https://seul96.tistory.com/85 [Android] Padding/layout_margin, visibility 속성 : https://seul96.tistory.com/312 |
반응형
'💻 개발과 자동화' 카테고리의 다른 글
| [Android] activity 전환, Intent 예시 + 4대 컴포넌트 (0) | 2019.04.29 |
|---|---|
| [Android] 위치 배열 Gravity vs Layout(Linear|Relative) (0) | 2019.04.29 |
| [Android] 토스트(Toast) / 배경색 변경 방법 + 색상표 (0) | 2019.04.29 |
| [Android] manifests, java, res / 레이아웃 유형 (0) | 2019.04.25 |
| [Android] 명화와 제목, 작가, 설명 배치 고흐(Gogh) (0) | 2019.04.25 |


댓글