System Structure
오늘은 외부망에 Open SSL 설치 및 Apache에 적용해보도록 하겠습니다.

당연히 Apache에 적용 될 것이기 때문에 Apache가 설치되어있어야 합니다.
Apache 설치 방법 참고 : https://seul96.tistory.com/346
[CentOS7] Apache 설치 (폐쇄망, 인터넷X, Local yum repo)
폐쇄망이면서 인터넷은 안되고 Local yum repo만 구성되어있는 환경을 구성하고 Apache를 설치했습니다. Local yum repo 설치 방법은 아래를 참고 해주세요. https://seul96.tistory.com/343 [CentOS 7.8] local y..
seul96.tistory.com
Apache - tomcat 연동 방법 참고 : https://seul96.tistory.com/347
Apache - Tomcat 연동 (물리적 분리 - 외부망 : WEB, 내부망 : WAS)
오늘은 Apache - tomcat을 연동해보도록 하겠습니다. 이 글에서는 외부망에는 WEB서버, 내부망에는 WAS 서버로 물리적으로 WEB, WAS 서버가 분리되어있다고 가정하고 서술했습니다. 만약 WEB WAS 서버가
seul96.tistory.com
[요약]
자세한 설명은 아래를 참고 해주세요.
1. open ssl 설치 확인
rpm -qa openssl // openssl version
#설치 안되어있을 시
yum install openssl

2. mod ssl 확인
yum info mod_ssl
yum install mod_ssl
# mod_ssl.so 확인
cd /etc/httpd/modules/
ls mod_ssl*

3. 개인키 생성 -> 서버 개인키인 server.key 파일이 생성된다.
openssl genrsa -des3 -out server.key 2048
PW:1q2w3e4r

4. 인증요청서 생성 -> 서버 개인키 패스워드 입력
openssl req -new -key server.key -out server.csr
A challenge password []: An optional company name []: -> 그냥 엔터

5. (Optional) 개인키에서 패스워드 제거
cp server.key server.key.origin
openssl rsa -in server.key.origin -out server.key
ll server*
패스워드가 제거된 파일 server.key 원래 파일 server.key.origin

6. 인증서 생성 -> 개인키, 인증요청서 가지고 인증서 생성
openssl x509 -req -days 750 -in server.csr -signkey server.key -out server.crt

7. 확인
cat server.key | head -3
cat server.crt | head -3

8. 개인키와 인증서 설치 -> httpd.conf 파일에 복사
cp server.key /etc/httpd/conf/
cp server.crt /etc/httpd/conf/

9. httpd.conf 설정 (맨 아래 추가) shift + g
vi /etc/httpd/conf/httpd.conf
NameVirtualHost *:443
<VirtualHost *:443>
SSLEngine on
SSLCertificateFile /etc/httpd/conf/server.crt
SSLCertificateKeyFile /etc/httpd/conf/server.key
SetEnvIf User-Agent ".*MSIE.*" nokeepalive ssl-unclean-shutdown
CustomLog logs/ssl_request_log "%t %h %{SSL_PROTOCOL}x %{SSL_CIPHER}x \"%r\" %b"
DocumentRoot /var/www/html
</VirtualHost>

10. ssl.conf 설정 -> VirtualHost _default_:443 아래에 추가
vi /etc/httpd/conf.d/ssl.conf
<VirtualHost _default_:443>
  # 확장자 jsp, json, xml, do를 가진 경로는 woker tomcat으로 연결하는 구문입니다.
  JkMount /*.jsp tomcat
  JkMount /*.json tomcat
  JkMount /*.xml tomcat
  JkMount /*.do tomcat
  JkMount /*.jspx tomcat

11. 방화벽 및 apache 재시작
firewall-cmd --permanent --zone=public --add-port=443/tcp
firewall-cmd --reload
systemctl stop/start/restart/status httpd (-l)

12. 웹 브라우저 테스트
https://192.168.56.103/
1. SSL 설치 및 SSL 적용
1.1. SSL 설치
1.1.1. ssl 설치 확인 2가지 방법
1.1.1.1. rpm -qa openssl
rpm -qa openssl
1.1.1.2. openssl version
openssl version
# 설치 안되어있으면(minimal 등으로 설치 하지 않았으면 보통 설치되어있음)
yum install openssl
1.1.1. openssl-devel 설치
yum -y install openssl-devel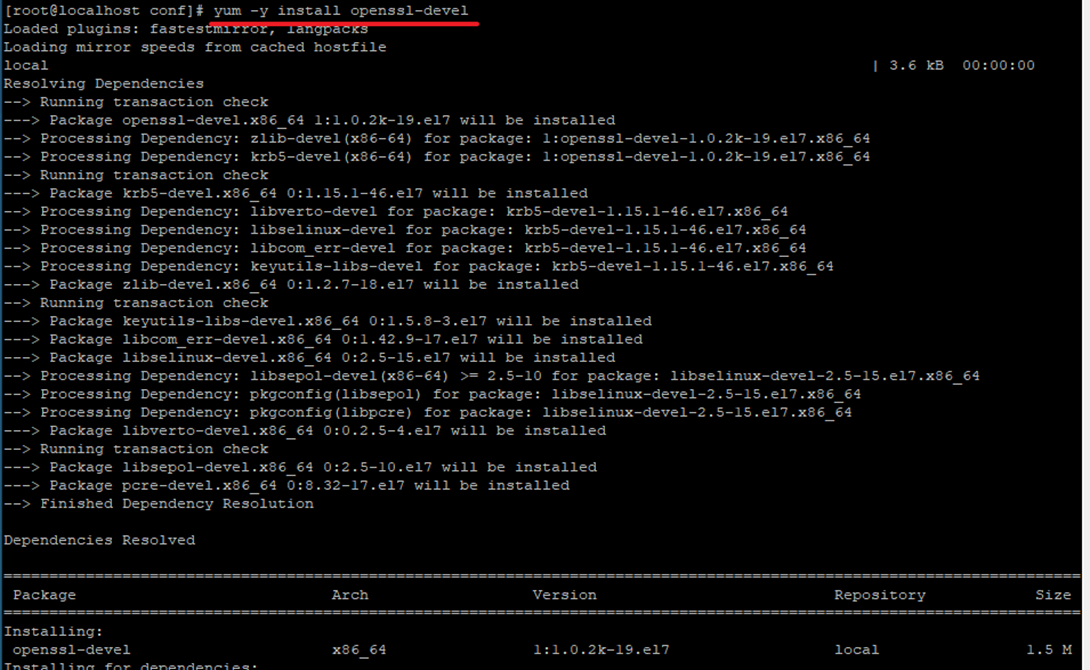
1.1.1. mod_ssl 설치
# 설치될 mod_ssl 확인
yum info mod_ssl

# mod_ssl 설치
yum install mod_ssl

# 설치된 mod_ssl.so 확인
cd /etc/httpd/modules/
ls mod_ssl*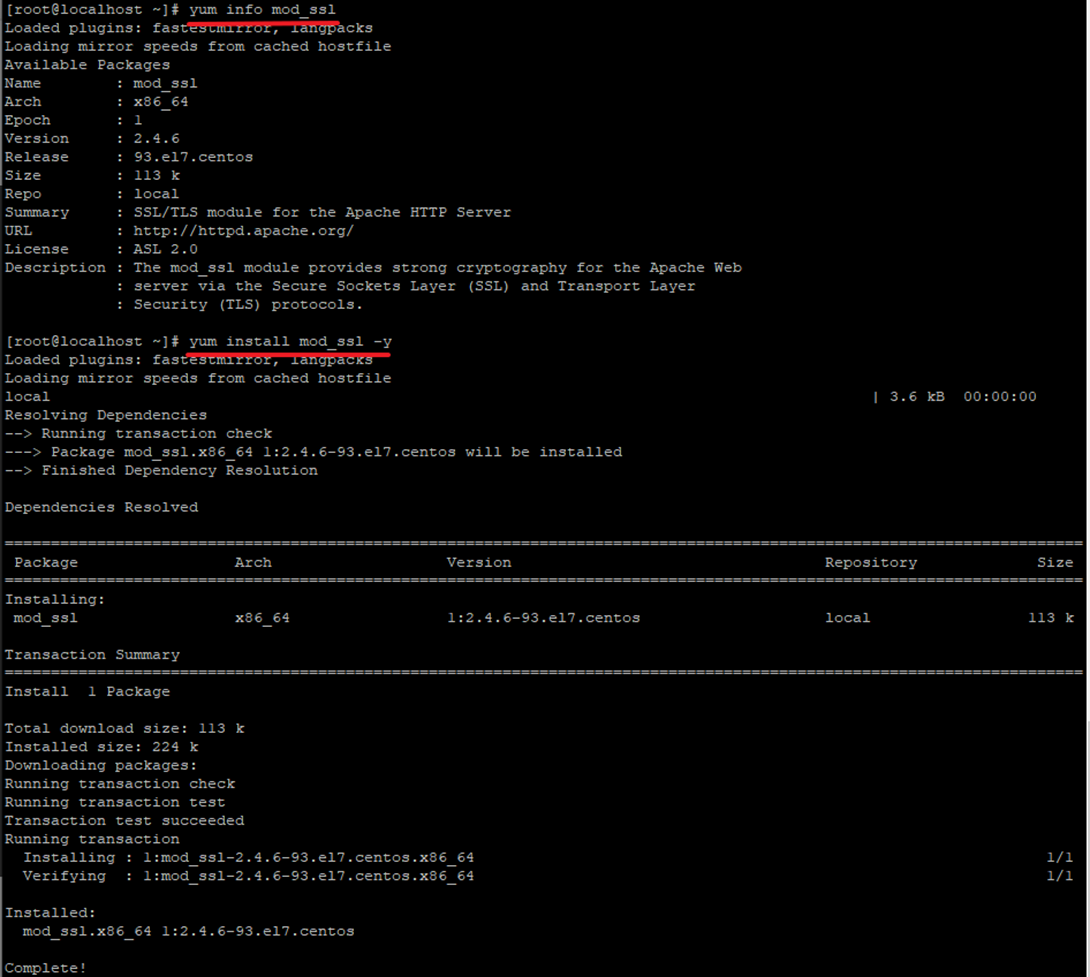
1.2. SSL 인증서 생성
1.2.1. 개인키 생성 -> 서버 개인키인 server.key 파일 생성됨.
[root@localhost ~]# openssl genrsa -des3 -out server.key 2048
사용하고 싶은 패스워드 입력
Generating RSA private key, 2048 bit long modulus
.............+++
...................................+++
e is 65537 (0x10001)
Enter pass phrase for server.key: 사용하고싶은패스워드
Verifying - Enter pass phrase for server.key:패스워드확인
[root@localhost ~]# openssl req -new -key server.key -out server.csr
Enter pass phrase for server.key:
You are about to be asked to enter information that will be incorporated
into your certificate request.
What you are about to enter is what is called a Distinguished Name or a DN.
There are quite a few fields but you can leave some blank
For some fields there will be a default value,
If you enter '.', the field will be left blank.
-----
Country Name (2 letter code) [XX]:KR
State or Province Name (full name) []:Seoul
Locality Name (eg, city) [Default City]:Sungdong
Organization Name (eg, company) [Default Company Ltd]:Dream(회사이름)
Organizational Unit Name (eg, section) []:Develop(부서)
Common Name (eg, your name or your server's hostname) []:본인이름
Email Address []:본인_email@gmail.com
Please enter the following 'extra' attributes
to be sent with your certificate request
A challenge password []:그냥엔터
An optional company name []:그냥엔터
1.2.2. (Optional) 개인키에서 패스워드 제거
[root@localhost ~]# cp server.key server.key.origin
[root@localhost ~]# openssl rsa -in server.key.origin -out server.key
[root@localhost ~]# ll server*
-rw-r--r--. 1 root root 1050 12월 13 16:56 server.csr
-rw-r--r--. 1 root root 1679 12월 13 17:23 server.key
-rw-r--r--. 1 root root 1751 12월 13 17:23 server.key.origin
1.2.3. 인증서 생성 -> 개인키, 인증요청서 가지고 인증서 생성
[root@localhost ~]# openssl x509 -req -days 3650 -in server.csr -signkey server.key -out server.crt
Signature ok
subject=/C=KR/ST=Seoul/L=Sungdong/O=Dream/OU=Develop/CN=Seulgi/emailAddress=xotmfrlox@gmail.com
Getting Private key
1.2.4. key, crt 생성 확인
cat server.key | head -3
cat server.crt | head -3
1.2.5. 개인키와 인증서 httpd.conf 파일에 복사 및 설정
cp server.key /etc/httpd/conf/
cp server.crt /etc/httpd/conf/

vi /etc/httpd/conf/httpd.conf
NameVirtualHost *:443
<VirtualHost *:443>
SSLEngine on
SSLCertificateFile /etc/httpd/conf/server.crt
SSLCertificateKeyFile /etc/httpd/conf/server.key
SetEnvIf User-Agent ".*MSIE.*" nokeepalive ssl-unclean-shutdown
CustomLog logs/ssl_request_log "%t %h %{SSL_PROTOCOL}x %{SSL_CIPHER}x \"%r\" %b"
DocumentRoot /var/www/html
</VirtualHost>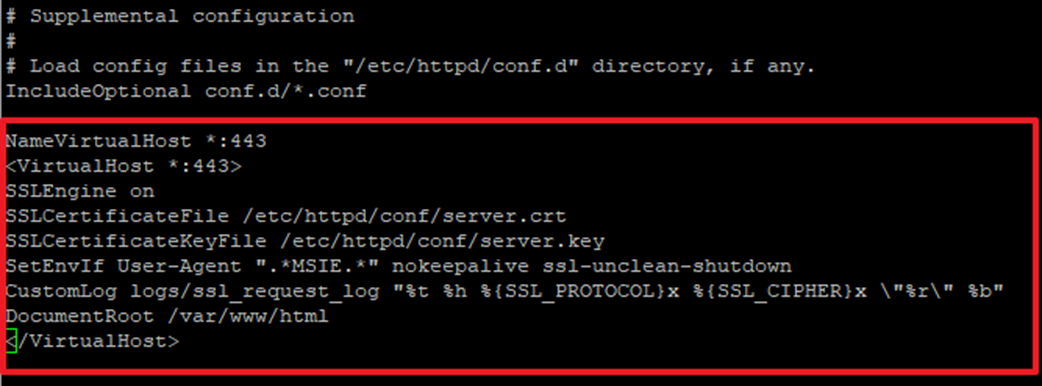
1.2.6. ssl.conf 설정 -> VitualHost_default_:443 아래에 추가
vi /etc/httpd/conf.d/ssl.conf

<VirtualHost _default_:443>
  # 확장자 jsp, json, xml, do를 가진 경로는 woker tomcat으로 연결하는 구문입니다.
  JkMount /*.jsp tomcat
  JkMount /*.json tomcat
  JkMount /*.xml tomcat
  JkMount /*.do tomcat
JkMount /*.jspx tomcat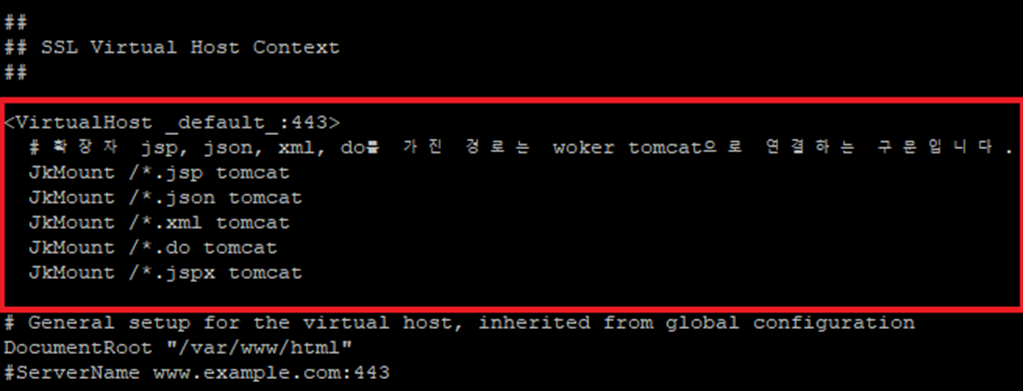
1.3. 방화벽 해제 및 apache 시작
firewall-cmd --permanent --zone=public --add-port=443/tcp
firewall-cmd --reload
systemctl stop/start/restart/status httpd (-l)
1.4. 웹 브라우저 테스트
https://192.168.56.103/ -> 본인 IP주소

1.5. 에러 모음
1.5.1. Invalid command 'SSLEngine', perhaps misspelled or defined by a module not included in the server configuration
[root@localhost ~]# systemctl status httpd -l
● httpd.service - The Apache HTTP Server
Loaded: loaded (/usr/lib/systemd/system/httpd.service; enabled; vendor preset: disabled)
Active: failed (Result: exit-code) since 월 2021-12-13 17:40:03 KST; 42s ago
Docs: man:httpd(8)
man:apachectl(8)
Process: 6534 ExecStop=/bin/kill -WINCH ${MAINPID} (code=exited, status=0/SUCCESS)
Process: 6538 ExecStart=/usr/sbin/httpd $OPTIONS -DFOREGROUND (code=exited, status=1/FAILURE)
Main PID: 6538 (code=exited, status=1/FAILURE)
12월 13 17:40:03 localhost.localdomain systemd[1]: Stopped The Apache HTTP Server.
12월 13 17:40:03 localhost.localdomain systemd[1]: Starting The Apache HTTP Server...
12월 13 17:40:03 localhost.localdomain httpd[6538]: AH00526: Syntax error on line 77 of /etc/httpd/conf/httpd.conf:
12월 13 17:40:03 localhost.localdomain httpd[6538]: Invalid command 'SSLEngine', perhaps misspelled or defined by a module not included in the server configuration
12월 13 17:40:03 localhost.localdomain systemd[1]: httpd.service: main process exited, code=exited, status=1/FAILURE
12월 13 17:40:03 localhost.localdomain systemd[1]: Failed to start The Apache HTTP Server.
12월 13 17:40:03 localhost.localdomain systemd[1]: Unit httpd.service entered failed state.
12월 13 17:40:03 localhost.localdomain systemd[1]: httpd.service failed.
[root@localhost ~]#
에러해결
[root@localhost ~]# yum info mod_ssl
[root@localhost ~]# yum install mod_ssl -y
[root@localhost ~]# systemctl restart httpd
다시 잘 시작되는것을 확인

1.6. (참고) tomcat에 SSL에적용
…./conf/server.xml 수정
예) D:\tomcat\apache-tomcat-7.0.107\conf\server.xml
<Connector SSLEnabled="true" URIEncoding="UTF-8" ciphers="TLS_ECDHE_RSA_WITH_AES_128_CBC_SHA256, TLS_ECDHE_RSA_WITH_AES_128_CBC_SHA,TLS_ECDHE_RSA_WITH_AES_256_CBC_SHA384, TLS_ECDHE_RSA_WITH_AES_256_CBC_SHA,TLS_ECDHE_RSA_WITH_RC4_128_SHA, TLS_RSA_WITH_AES_128_CBC_SHA256,TLS_RSA_WITH_AES_128_CBC_SHA,TLS_RSA_WITH_AES_256_CBC_SHA256, TLS_RSA_WITH_AES_256_CBC_SHA,SSL_RSA_WITH_RC4_128_SHA" clientAuth="false" keystoreFile="D:\tomcat\apache-tomcat-7.0.107\seulgi.fido.com.jks" keystorePass="1q2w3e4r" maxThreads="150" port="8443" protocol="org.apache.coyote.http11.Http11NioProtocol" scheme="https" secure="true" sslEnabledProtocols="TLSv1,TLSv1.1,TLSv1.2" sslProtocol="SSL"/>
<!--<Connector port="8009" protocol="AJP/1.3" redirectPort="8443" />
☞ 더 많은 인프라 구축 방법(폐쇄망)을 보고 싶으면 아래 링크를 클릭해주세요.
2021.12.13 - [Linux] - CentOS 7.8 설치 및 putty 접속 (원하는 버전 설치 링크 포함)
2021.12.14 - [Linux] - [CentOS 7.8] local yum repository 구성 (폐쇄망x, 인터넷x)
2021.12.17 - [DATABASE/DB install & upgrade] - CentOS7 Mysql5.7 install (폐쇄망, internet X)
2021.12.22 - [WEB|WAS] - [CentOS7] Apache 설치 (폐쇄망, 인터넷X, Local yum repo)
2021.12.23 - [WEB|WAS] - Apache - Tomcat 연동 (물리적 분리 - 외부망 : WEB, 내부망 : WAS)
2021.12.24 - [Security] - [CentOS7] SSL 설치 및 SSL 적용
2022.01.27 - [WEB|WAS] - Apache, Tomcat tuning
2022.03.16 - [DATABASE] - Mysql, MariaDB PASSWORD Lifetime 설정(만료기간)
'Security' 카테고리의 다른 글
| FIDO의 모든것 (0) | 2021.11.24 |
|---|---|
| FIDO (0) | 2020.08.06 |
| CA (0) | 2020.07.10 |
| Certificate(인증서) (0) | 2019.10.02 |
| Encrypt virtual disk(가상 디스크 암호화) (0) | 2019.09.18 |


댓글